Bottled Up
Four easy steps to colorful, original centerpieces
Finally, the spring months are here, and the Internet is ablaze with clever projects and craft ideas for all types and themes of weddings that you can do yourself. Color plays an important part in spring trends this season, as well as elegance and simplicity. DIY wedding projects are, of course, great alternatives to the endless and expensive centerpieces, favors, place cards and other wedding necessities. If you’re not the average crafter, fear not! We’ve gotten the inside scoop from the artists behind these creative projects, as well as step-by-step instructions that can leave even the least crafty individual with a beautiful finished project.
The spring season is the easiest time to showcase your all-time favorite colors, and the most popular colors of this season range from turquoise, cobalt and violet to poppy, coral and yellow. Amanda Nistor, owner and editor of Ruffled, shares with us her DIY project of colorful wine bottle centerpieces, which are perfect for representing your favorite spring color. Extremely easy to accomplish, you will need wine bottles, liquid soap, alcohol swabs, rubbing alcohol, Goo Gone and/or a hard dish brush, spray paint, quick drying high gloss white spray paint or white primer spray paint, quick drying high gloss spray in your favorite color, and an old sheet or any sort of covering for the surface you will be painting on.
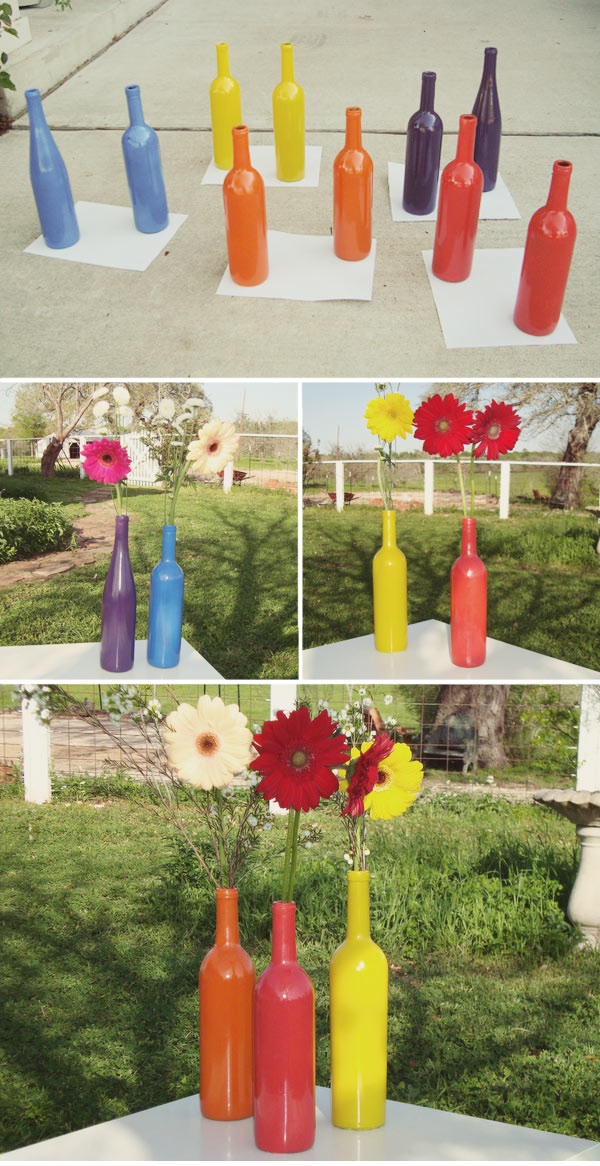 |
| Courtesy of RuffledBlog.com |
1. Completely remove the wine label off the bottle. This can be done by soaking the bottles in warm soapy water for 10 to 20 minutes. If remnants of the label still remain, try using rubbing alcohol, Goo Gone, or a hard dish brush to remove the excess. Make sure to thoroughly rinse the bottles, and let them completely dry.
2. On a hard, covered surface, spray the bottles with one thin, even coat of white spray paint or primer. This is just an undercoat, so no need to be perfect. Be careful not to get too close to the bottle, in order to prevent paint from getting too thick and causing it to drip. Let the bottles dry for about 15 minutes; if sticky to the touch, they still need more time to dry.
3. Repeat the primer step about three to four more times, but instead, use your chosen color. As long as your paint doesn’t get too thick, you can repeat until you are pleased with the end color. If you need to get a better view of your paint job, pick up the bottle by the mouthpiece.
4. Don’t forget to spray both the bottom and top of the bottle to ensure that no glass is showing through. Let your bottles dry completely. Fill them with simple flowers such as Gerber daisies, carnations or daffodils, and voila, your centerpieces are ready.


.jpg")